because not only have i just gotten back online, but also that we've switched to the new version of blogger, i'd be running some maintenance tasks in terms of site formatting, etc.
bear with us if it gets a bit messy.
ETA: 02 0027 Jan 2007 Tues.
i have more or less finished adding the tags to the last few entries, etc. tags are not provided by blogger, so del.icio.us will now only be used as a comprehensive index for the recipes we're sharing.
hope everyone's having a better new year than i'm having so far.
Saturday, December 30, 2006
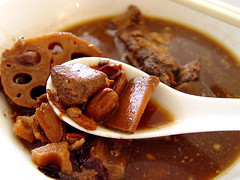
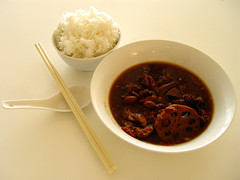
Pork Rib & Lotus Root Soup.
it's now ascertained that moving house is nothing if not a bitch. after what seems like forever, i've finally got myself more or less settled into the new place in the city. plus, i bought me some new kitchenware to celebrate the move; am now a proud owner of (among other things) a handheld food processor and the loveliest TEFAL wok! not to mention i'm absolutely in love with the new kitchen, pity the dishwasher doesn't really work.
anyway, back to today's dish!
personal history.
this is one of my favourite recipes, something passed down to me from my grandmother. it's arguably one of the few dishes of hers that i enjoy over-eating since i was a kid.
in general, the dish is quite a common sight in chinese families. however, what i've learnt from many of my friends is that most of their families and in fact hawkers leave the soup in its 'natural' flavour. my grandmother swears by a bit of rock sugar, and for that i think she rawks!
Ingredients.
500g, pork ribs (much of the flavour comes from the bones)
200g, lotus root (washed and sliced)
1.5 cup, dried red dates
1.5-2 cup, raw peanuts
1.5 cup, chinese lycium
1 cup, rock sugar
a few cups, hot water (enough to drown all the ingredients)

Additional Notes On Ingredients
1) my grandmother says that fresh young lotus roots give the best taste; i'm resorting to freeze-pack ones from the local asian grocer's because i can't find lotus roots around here.
2) sometimes my grandmother adds dried longan as well. if you're a fan of the taste of longan, halve the amount of dates and replace that half with longan.
Special Crockery
i'm using an electric crockery pot for this dish because it takes time for all the ingredients to break down. give it at least twelve hours in the crock pot, although i normally go for twenty-four.
Serves
3-4
Step 1-and-only-1: Toss it all in!
too simple! drop the porb ribs to the bottom of the pot, then followed by the rest of the ingredients, try to leave the roots for last. pour the hot water into the pot, cover and let it cook on high for at least twelve hours. when it's ready, the aroma of the soup will naturally fill the room.

when it's done cooking, you'd see that the soup and most of its ingredients turns a dark umber. the peanuts and dates normally continue to float in the soup.
Final Serve.
the dish is best served alongside some steamed rice. because there's meat in the soup, there's really not much of a need for additional sides to go with.
More Notes
if you're not a fan of rock sugar, you might want to taste the soup before adding any rock sugar to the mixture. this is best done at the half-way mark (i.e. twelve hours, in my case), so that you give the sugar some time to infuse with the other ingredients, and vice versa. alternatively, you can omit the rock sugar altogether because the lycium, dates and longan are all by right natural sweeteners.
Sunday, December 17, 2006
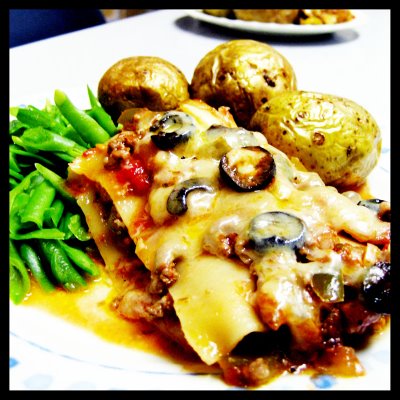
Rawker's Lasagna
For the Rawk stars.
In celebration of finally recieving my care package from home (some of it at least), I made Lasagna (its one of the toughest words i've ever had to spell).
Its very simple to make and very yummy.
Took about 45 mins in the oven.
Actually, I made it because I had too many peppers, potatoes and cans of tomato in the kitchen.
We could/should call this series of posts "What to do with canned Tomato, green peppers and onions". or "same ingredients many dishes".
You make sauce and roll with it.
Ingredients.
3 sheets of lasagna pasta (i used the pre-cooked kind)
1 large white onion
1 large green bell pepper (capsicum)
1 can of plum/chopped tomatoes in tomato juice
25g of butter (about 1 cm of the stick)
250g minced beef
Worcestershire sauce
Tomato Ketchup
Salt & black pepper to taste.
a dash of italian herbs
1 block of cheddar cheese (this is imprecise. its more like, as much cheese as you'd like)
optional side dishes:
9 really small potatoes (3 per person)
3 portions of french beans
Serves.
3.
Step 1: Pre-heat your oven
200 degrees celcius. just turn it on.
Step 2: Prepare the vegetables & meat & cheese
Wash and chop up the onion, and green pepper into little cube sizes/squares.
Marinate your beef with a liberal sprinkling of herbs and salt and a few dashes of Worcestershire sauce and mix evenly. leave aside.
Slice your black olives into little "O"s and leave aside.
Shred your cheese. as much as you'd like. you'll be using this to stick everything together!
Step 3: the Sauce
This is kind of like making a pasta sauce.
melt the butter in your pan, and saute your onions and green peppers till tender, then throw in the beef and stir it around till the beef seperates in to mince and browns, then pour in your can of chopped tomato and sauce.
stir in some tomato ketchup, enough to cut the sour of the tomato juice in the pan. (taste it)
add salt and pepper to taste.
let the sauce simmer and then take it off the heat.
It should still have liquid.
Step 4: Layer!
I used a bread tin.
pour in a layer of the liquid (just the liquid) from your sauce into the bottom of the tin.
this is to prevent sticking.
then place a piece of pasta over the liquid.
now add a layer the beef and vege. and a layer of cheese.
and so on.
you might need to gauge how much to layer visually.
just remember you're making 3 layers and the top most layer will be cheese. not pasta.
now, on the top most layer of beef and vege, layer on the black olives.
it should look like this:

Please note that the last layer of cheese only goes on in the last 15 mins of baking.
Step 5: Bake!
Your tin should be filled and ready to bake, sans the last top layer of cheese.
put it in your preheated oven for about 30 mins.
and after 30 mins, take it out, top off with cheese to melt and brown on top.
it should look ike this:

Optional Side dishes:
throw the potatoes in the oven and bake them along with your lasagna.
boil and drain your french beans in water and a sprinkle of salt. (for health)
Final Serve.
Getting the lasagna out of the pan is ... tricky.
cut 3 even portions and use a spatula to lift the lasagna out of the tin.
plate and serve with your sides of choice.
hurrah!
In celebration of finally recieving my care package from home (some of it at least), I made Lasagna (its one of the toughest words i've ever had to spell).
Its very simple to make and very yummy.
Took about 45 mins in the oven.
Actually, I made it because I had too many peppers, potatoes and cans of tomato in the kitchen.
We could/should call this series of posts "What to do with canned Tomato, green peppers and onions". or "same ingredients many dishes".
You make sauce and roll with it.

Ingredients.
3 sheets of lasagna pasta (i used the pre-cooked kind)
1 large white onion
1 large green bell pepper (capsicum)
1 can of plum/chopped tomatoes in tomato juice
25g of butter (about 1 cm of the stick)
250g minced beef
Worcestershire sauce
Tomato Ketchup
Salt & black pepper to taste.
a dash of italian herbs
1 block of cheddar cheese (this is imprecise. its more like, as much cheese as you'd like)
optional side dishes:
9 really small potatoes (3 per person)
3 portions of french beans
Serves.
3.
Step 1: Pre-heat your oven
200 degrees celcius. just turn it on.
Step 2: Prepare the vegetables & meat & cheese
Wash and chop up the onion, and green pepper into little cube sizes/squares.
Marinate your beef with a liberal sprinkling of herbs and salt and a few dashes of Worcestershire sauce and mix evenly. leave aside.
Slice your black olives into little "O"s and leave aside.
Shred your cheese. as much as you'd like. you'll be using this to stick everything together!
Step 3: the Sauce
This is kind of like making a pasta sauce.
melt the butter in your pan, and saute your onions and green peppers till tender, then throw in the beef and stir it around till the beef seperates in to mince and browns, then pour in your can of chopped tomato and sauce.
stir in some tomato ketchup, enough to cut the sour of the tomato juice in the pan. (taste it)
add salt and pepper to taste.
let the sauce simmer and then take it off the heat.
It should still have liquid.
Step 4: Layer!
I used a bread tin.
pour in a layer of the liquid (just the liquid) from your sauce into the bottom of the tin.
this is to prevent sticking.
then place a piece of pasta over the liquid.
now add a layer the beef and vege. and a layer of cheese.
and so on.
you might need to gauge how much to layer visually.
just remember you're making 3 layers and the top most layer will be cheese. not pasta.
now, on the top most layer of beef and vege, layer on the black olives.
it should look like this:

Please note that the last layer of cheese only goes on in the last 15 mins of baking.
Step 5: Bake!
Your tin should be filled and ready to bake, sans the last top layer of cheese.
put it in your preheated oven for about 30 mins.
and after 30 mins, take it out, top off with cheese to melt and brown on top.
it should look ike this:

Optional Side dishes:
throw the potatoes in the oven and bake them along with your lasagna.
boil and drain your french beans in water and a sprinkle of salt. (for health)
Final Serve.
Getting the lasagna out of the pan is ... tricky.
cut 3 even portions and use a spatula to lift the lasagna out of the tin.
plate and serve with your sides of choice.
hurrah!
Saturday, December 16, 2006
Money Issues
d. said i should mention how much i spend when i cook. because, apparently, i do it for really cheap and it looks ... not so cheap.
hm. go figure.
well, on average, i spend a little over or under 1 pound to feed 3.5 people (out of four, one's a small eater.)
here's some cost breakdowns:
a can of peeled tomatoes with sauce - 15 pence
a can sweet corn - 13 pence
5kg of potatoes - 1 pound
1.5kg of onions - 60 pence
1kg rice - 1 pound
1 packet of wholewheat pasta - 23 pence
1 box of mushrooms - 1 pound
1 packet of frozen french beans (or frozen vegetables in general) - 80 pence to 1 pound
1 can of black olives - 50 pence
400g minced beef - 75 pence
1 tray of 8 chicken whole thighs (thigh+drumstick attached. big) - 5 pounds
1 tray of 12 cuts of pork - 5 pounds
the meat is cheaply bought at the wet market. they sell them as a whole tray and are generally, not the best cuts of the meat (as in , the pork comes with a big piece of bone attached) and i figure, meat is meat is meat. its what you do with it that counts.
so we make bak kut teh with the bones.
and cut the rest of the meat in chunks or slices.
i have to de-fat the (fatty) chicken myself and seperate it from the thigh and that bit of leg that they left behind after chopping the feet off and lop off the 'bishops nose' (chicken butt).
basically i have to do a bit of knife work.
but it all turns out fine.
don't use a lot.
don't over cook.
less is more.
quality over quantity.
etcetra.
i also shop at england's Wal-mart alternative, ASDA ... cheap food in general.
house brand type food with no picture on the label.
just the words.
i know it sounds gross, i thought so to and refused to touch the stuff for a while.
but i've actually tried the stuff with and without labels.
SOME stuff is gross. THOSE you avoid like the plague.
but in general, its the same. you basically save money, because they don't spend on packaging and fancy color printing. is all.
well.
'cheap' is relative.
i think i'm doing moderately well with the money. sometimes i feel i might be overspending.
*shrugs*
go figure.
Monday, December 11, 2006
Tangy Oven Baked Salad with Steamed Chicken
We've been trying to eat healthy.
This is ... somewhat healthy. I have a little butter in it.
It could be taken out or substituted. (actually, this dish requires no oil whatsoever. the butter was put in for ... flavor. but I'm sure it'll do just fine without.)

Ingredients.
1 large white onion
1 large red pepper (capsicum)
5-8 small white mushrooms
2 cups of french beans
1/2 can cream of chicken soup
1 lemon
15g of butter
3 chicken breasts (or thighs)
black pepper to taste.
Serves.
3.
Step 1: Pre-heat your oven
Switch on your conventionial oven and pre-heat it at 190-200 degrees celcius for about 15-20 minutes. or however long you'd take to prepare all the other ingredients.
(no science here, you really justwant your food to cook. so don't worry about it. just turn it on.)
Step 2: Prepare the vegetables
Wash and chop up the onion, capsicum and mushrooms, then throw them into a deep oven safe
pan (i used a bread tin), along with your beans and mix the vegetables up evenly.
Step 3: the Sauce
The resulting sauce of this dish is made up of the vegetable's own liquid as well, which will appear when they are cooked. so don't worry if it looks a little dry now.
pour in the 1/2 can of soup, letting it flow through the gaps, as well as the juice of the lemon (there is no need to mix it now, just make sure the liquids you have at this point are evenly spread over the top and flow though the gaps. we'll mix it later.)
and finally, slice the butter and lay over your vegetables.
Step 4: Bake!
Cover your vegetables with a piece of foil and shove it in the middle of the oven to bake for 30-40 minutes.
Step 5: Steam Chicken
For simplicity and health, i just washed the chicken, put it in a metal plate on a rack over a pot of water and steamed it with no marinate whatsoever. this will take about 20 minutes or so to cook (poke it to check it. the juices should run clear when its done.)
Step 6: Shred Chicken
Let your chicken cool and tear the chicken into lovely shreds to lay on top of your warm salad.
Final Serve.
The vegetables should be cooked and soft by now. Stir it up in the baking tin and add pepper to taste.
Serve warm on a plate and top off with chicken shreds.
I had some baked potatoes and just added that in as well.
Voila.
warm food ... great in the winter :)
Thursday, November 30, 2006
hiatus.
i'm back in melbourne but also in the process of moving to a new apartment. while utensils are put away, i find great delight in visiting--for lunch--Ken Zan (GPO), Degraves Expresso, Blufish (Central Pl), Supper Inn (chinatown, off Lt Bourke), Mekong (Swanston), Mr Tulk (La Trobe/ Swanston), and--for dinner, lunch or just drinks--Cookie (Swanston) and Hairy Canary (Lt Collins).
Thursday, November 16, 2006
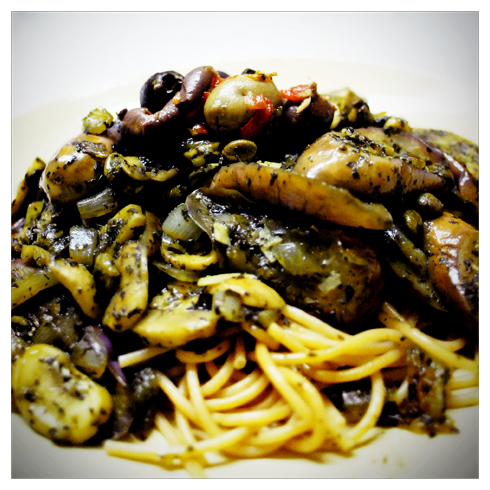
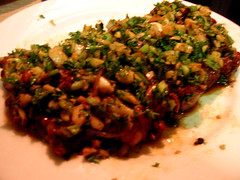
Sautéed Eggplant and Mushroom with Mint Vinaigrette
I made this for lunch on my birthday, but i didn't expect it to be any good.
turns out, eggplant, mintsauce and mushrooms go really well with pasta.
hm.
and i've developed a special liking to wholewheat pasta. :) it just tastes better.
as for the mint sauce, i just had that lying around in the kitchen.
(i'll tell you how to make mint sauce from scratch near christmas time)
here we go.
Ingredients.
1 serving of wholewheat spaghetti
1 eggplant / brinjal
8-10 white small mushrooms
3 cloves garlic
1 small onion
25g butter (or 1cm of the stick)
2 tbsp ready made mint sauce
mixed herbs + salt + pepper to taste
optional:
some olives. if you like them.
Serves.
1.
Step 1: Make pasta
you know the drill.
bring a pot of water to a boil, throw in some salt and some pasta.
cook till soft or if you like, al dente (read: chewy)
meddle with everything else while this is happening.
Step 2: Preparing the vegetables
slice the eggpant at a 30 degree angle, making each slice no more than 1cm thich. (thiis so the eggplant gets nice and soft and sweet more quickly.)
slice the mushrooms and chop up the onion and garlic, then set everything aside.
Step 3: Saute the vegetables
heat up a pan and melt your butter in it. throw in half of the chopped garlic and all of the onion and fry till fragrant.
now, throw in the eggplant and let the butter and heat soften it. halfway through, throw in the mushrooms as well.
now, you may find that the pan is getting a little dry. no fear. its time to put in the mint sauce.
the vinegar from the mint sauce adds moisture to the vegetables (which should now be letting out some juices of their own) and thus, you have a sauce.
add salt, pepper and mixed herbs to taste.
(watch the salt, remember, your butter is already salted.)
Step 4: Toss it in the pan
fish out your pasta and toss it in the pan (which should now be on med-low heat so as not to overcook the vegetables while tossing)
also, throw in the reminder garlic.
(i always do this, because fresh garlic is what makes pasta smell so nice.)
Final Serve.
plate your pasta and garnish with more mixed herbs and olives, if you have them. :)
ta-da!
happy birthday me.
.
Tuesday, November 14, 2006
Sunday, November 05, 2006
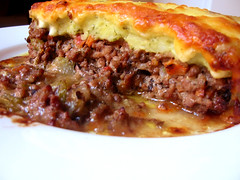
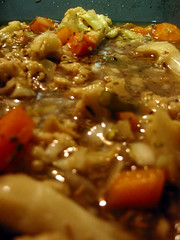
Cottage Pie.
History.
according to Food Timeline's entry on Shepherd's Pie, this English dish has its origins in the late Middle Ages (i.e. mid-16th Century AD). what began as meat served in pastry "coffyns" (coffins?) was only very late in the 19th Century cooked with mashed potatoes; the latter was a New World produce. Supposedly popular in the Northern regions of England and Scotland where sheep were in abundance (hence cooked with mutton and the name Shepherd's Pie), the pie became the people's answer to asian fried rice i.e. a creative way to rehash leftovers.
Shepherd's Pie = cooked with mutton
Cottage Pie = cooked with beef
Fisherman's Pie = cooked with fish
thesedays, it is but a relatively fuss-free dish for if/when you need to feed either an army of people or a ryce.
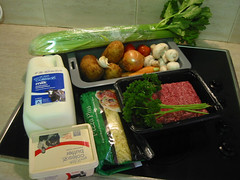
Ingredients.
(for meat base)
500g beef mince
3-4 clove, garlic
5-6 cup mushrooms
2-3 sticks, celery
4-5 baby carrots
1 onion (using brown)
2-3 tomatoes (using roma)
1 can, cream of mushroom (not in pic; using campbell's)
(for mash)
3-4 potatoes (using brown)
4-5 bunch, parsley
2-3 tbsp, fresh milk
1-2 tbsp, butter
(for cheese topping)
Pizza Mix (cheddar, parmesan, mozzarella)
you will also need a baking pan of substantial depth, subject to how thick you want your pie to be.
Serves.
3-4.
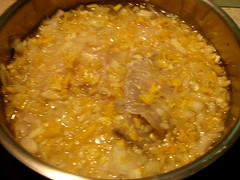
Step 1: Preparing Meat Mix!
finely chop up all your vegetables, separating the garlic and onion individually from the rest.
oil and heat up a sizable pan over a medium flame. when hot, throw your onions and beef mince into the pot and keep stirring. depending on how strong you like your garlic, you can either throw it in at this stage, or together with the rest of the vegetables later.
let it cook for 4-5 minutes before you throw the rest of the chopped up vegetables into the pan. don't forget to stir! while the vegetables are still cooking, add the cream of mushroom into the mixture. turn the heat down to a smaller flame, let it slowly simmer to a boil, and continue to boil for a while (3-4 minutes).
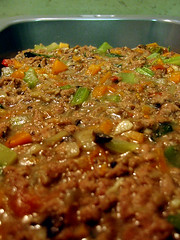
when that's done, pour the mixture into your baking pan and set it aside to cool for 0.5-1 hour. if you don't let it cool properly, the mash isn't going to sit well on your meat mixture. at this point, some people are known to put the meat mix into either the fridge or freezer even.
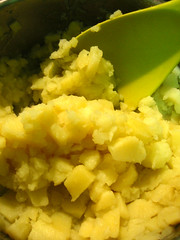
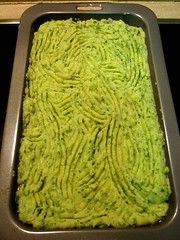
Making Mash Potato.
skin the potato before you put them in a pot of water to boil. add some salt into the water and let the potato boil for about 10 minutes or until it feels soft enough to mash.
meanwhile, mince or finely chop the parsley up.
when done, remove the pot from the fire and drain the water away. you may begin mashing the potatoes in the pot, adding the parsley, milk and butter in at this stage. mash and blend well until you get a relatively consistent and smooth mash.
Baking the First Two Layers.
set your oven to preheat at 200 degree C.
apply the mash potato on top of the meat mix which by now should have cooled in the baking pan. when you have the meat mix nicely covered with mash, score the layer of mash with a fork.
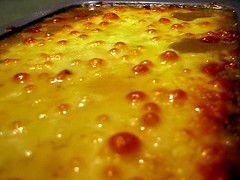
when ready, put the whole baking pan into your oven and let it cook for 15-20 minutes. remove the pan from the oven after. apply the cheese on top of the mash, ensuring that you've got all the mash more or less covered.

return the pan into the oven for another 15-20 minutes, until your cheese turns a lovely golden brown!
Final Serve.
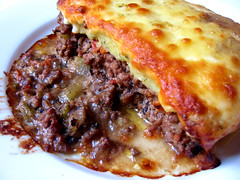
ryce and i both enjoyed it quite a bit. though this version of the cottage pie is a little shallow on the mash potato. so if you're a fan of mash potato, you might have to up the number of potatoes in your attempt.
also, i realised that the meat mixture was a bit too wet for me. but this is more of a problem if you're gunning for presentation points like i do. to ease the problem, you can always drain some gravy from the meat mix before you apply the mash on top.
...
..
.
ETA: 25 1615 November 2006 Saturday.
my friend fiq made a mince beef mix last week by frying the mince beef with tomato ketchup, black pepper and i think a bit of soy sauce. it tasted great! so ketchup might be an easy and inexpensive substitute for the cream of mushroom.
Friday, November 03, 2006
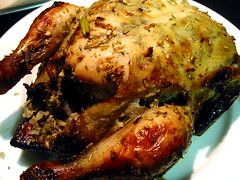
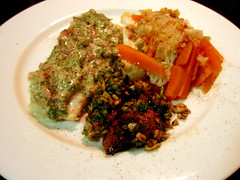
Rosemary Chicken with Vegetable Side.
obviously, i haven't been updating. the reason is that doing nothing can be an absolutely major preoccupation when you're back home in singapore for a holiday. there're so many ways to loaf, how does one even begin?
i know, i know, i know, woe is me.
what is most refreshing, however, is the fact that i'm again back to being looked after by my dear family (aka mom and grandma). it's been a while since someone else made sure that meals are decided and prepared without my active input--if i had any input it would be a specification on what i want to eat. as much as i aspire to be the bitch of the kitchen who decides what is and isn't cooking, i have to say i could very well get used to the life of being served.
on a cooking note, there're a couple of family recipes that i intend to learn while i'm back. among the mean dishes that my grandma is capable of producing, i'm particularly interested in mastering her Dark Sauce Pork, Lotus Root & Pork Rib Soup, and Hainanese Fried Vegetables. highly doubt i'd have the chance to figure out seasonal dishes like Longan Ginkgo Nut Soup, and rice dumplings this time around, but we'd see how things go.
until i learn those precious family recipes, i'd instead be clearing the backlog of recipes attempted back at ryce's place a month ago, beginning with a recipe introduced to me by my very good sydney-sider friend, fiq.
(because fiq remains skeptical towards both my cooking and fledgling relationship with the oven, i'd disclaim that the recipe has been reworked to my liking, and should therefore not reflect on him in any way--especially not on his mastery over his own kitchen and food.)
Ingredients. (See below for update.)
(for the chicken)
1 whole chicken (small)
2 onions (brown for us)
5-6 clove, garlic
5 inch, ginger
.25 cup, rosemary
2 lemons
3 tbsp, honey
2 tbsp, olive oil
2 tsp, salt
.5 cup, dry white wine (i'm using a semillon chardonnay instead)
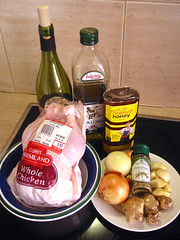
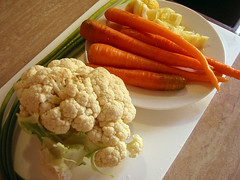
(for the vegetables)
5-6 baby carrots
.5 bunch, cauliflower
2 lemon leftover, from the chicken prep.
4-5 potatoes (missing in this round because we didn't have them)
(ignore the leek-like vegetable in my photo)
Serves.
3-4
Step 1: Preparing the chicken!
dice and even mince as fine as you can the onions, garlic, ginger and rosemary. mix them together and juice the lemons in. this is going to be the stuffing for your chicken.
rub the salt, honey and olive oil onto the chicken, remembering that you need to get some of it under the skin. when done, stuff the chicken with the mixture. i like to stuff some of it under the skin as well.
leave the stuffed-up chicken in a pot, and let it marinate in wine for at least 2 hours.
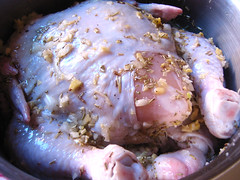
Step 2: Preparing the Vegetables.
other than the lemons, chop everything else up, and line the bottom of your baking tray with the vegetables. throw the lemon remains in as well. as the chicken cooks, the juices from the chicken will fall in with the vegetables to give you an interesting gravel.
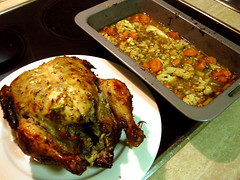
Step 3: Roasting!
preheat your oven to 150 degrees C. place the chicken on top of the vegetables, and pour the rest of the marinade into the tray. set the tray in when ready.
every .5 hour, you'd need to baste the chicken with the marinade/ gravy in the tray. make sure to flip the chicken as well.
the chicken should cook for at least 1.5 hours, until it turns a nice golden brown or when the juices run clear.
remove from oven when done.
Step 4: Remove Stuffing.
pretty self-explanatory, use a spoon to remove the stuffing from your chicken, and have it mixed into your vegetables.
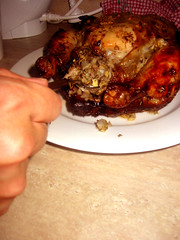
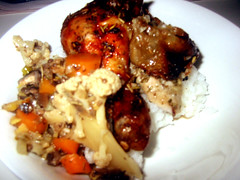
Final Serve.
check your vegetables for taste, and throw some pepper in for taste.
you can either serve the chicken whole like me, or chop it up into more decent looking proportions :)
Additional Notes.
fiq recommends that the ingredients for the stuffing from Step 1 be blended into a liquid, or at least into a thick paste. his version of this chicken is left in this marinate overnight. also, he recommends some soy sauce (abt 2 tbsp), although he doesn't use any wine in his recipe.
(look out for my attempt at a Cottage Pie, and a Chocolate Fudge Cake topped with Chocolate Mousse over the next few days...)
ETA: 4 1422 April 2007, Wednesday
after several attempts, i've come to the conclusion that:
(A) there's no need for honey,
(B) Semillon Sauvignon Blanc (mine's always a Wolf Blass) is a good dry white,
(C) there needs to be enough wine to reasonably submerge the chicken--no worries, you won't inebriate, at least 3cups therefore.
(D) you should replace brown with red/ spanish onions,
(E) it's good to let your chicken marinate for 24 hours, and
(F) there's no need for soy sauce.
i know, i know, i know, woe is me.
what is most refreshing, however, is the fact that i'm again back to being looked after by my dear family (aka mom and grandma). it's been a while since someone else made sure that meals are decided and prepared without my active input--if i had any input it would be a specification on what i want to eat. as much as i aspire to be the bitch of the kitchen who decides what is and isn't cooking, i have to say i could very well get used to the life of being served.
on a cooking note, there're a couple of family recipes that i intend to learn while i'm back. among the mean dishes that my grandma is capable of producing, i'm particularly interested in mastering her Dark Sauce Pork, Lotus Root & Pork Rib Soup, and Hainanese Fried Vegetables. highly doubt i'd have the chance to figure out seasonal dishes like Longan Ginkgo Nut Soup, and rice dumplings this time around, but we'd see how things go.
until i learn those precious family recipes, i'd instead be clearing the backlog of recipes attempted back at ryce's place a month ago, beginning with a recipe introduced to me by my very good sydney-sider friend, fiq.
(because fiq remains skeptical towards both my cooking and fledgling relationship with the oven, i'd disclaim that the recipe has been reworked to my liking, and should therefore not reflect on him in any way--especially not on his mastery over his own kitchen and food.)
Ingredients. (See below for update.)
(for the chicken)
1 whole chicken (small)
2 onions (brown for us)
5-6 clove, garlic
5 inch, ginger
.25 cup, rosemary
2 lemons
3 tbsp, honey
2 tbsp, olive oil
2 tsp, salt
.5 cup, dry white wine (i'm using a semillon chardonnay instead)
(for the vegetables)
5-6 baby carrots
.5 bunch, cauliflower
2 lemon leftover, from the chicken prep.
4-5 potatoes (missing in this round because we didn't have them)
(ignore the leek-like vegetable in my photo)
Serves.
3-4
Step 1: Preparing the chicken!
dice and even mince as fine as you can the onions, garlic, ginger and rosemary. mix them together and juice the lemons in. this is going to be the stuffing for your chicken.
rub the salt, honey and olive oil onto the chicken, remembering that you need to get some of it under the skin. when done, stuff the chicken with the mixture. i like to stuff some of it under the skin as well.
leave the stuffed-up chicken in a pot, and let it marinate in wine for at least 2 hours.
Step 2: Preparing the Vegetables.
other than the lemons, chop everything else up, and line the bottom of your baking tray with the vegetables. throw the lemon remains in as well. as the chicken cooks, the juices from the chicken will fall in with the vegetables to give you an interesting gravel.
Step 3: Roasting!
preheat your oven to 150 degrees C. place the chicken on top of the vegetables, and pour the rest of the marinade into the tray. set the tray in when ready.
every .5 hour, you'd need to baste the chicken with the marinade/ gravy in the tray. make sure to flip the chicken as well.
the chicken should cook for at least 1.5 hours, until it turns a nice golden brown or when the juices run clear.
remove from oven when done.
Step 4: Remove Stuffing.
pretty self-explanatory, use a spoon to remove the stuffing from your chicken, and have it mixed into your vegetables.
Final Serve.
check your vegetables for taste, and throw some pepper in for taste.
you can either serve the chicken whole like me, or chop it up into more decent looking proportions :)
Additional Notes.
fiq recommends that the ingredients for the stuffing from Step 1 be blended into a liquid, or at least into a thick paste. his version of this chicken is left in this marinate overnight. also, he recommends some soy sauce (abt 2 tbsp), although he doesn't use any wine in his recipe.
(look out for my attempt at a Cottage Pie, and a Chocolate Fudge Cake topped with Chocolate Mousse over the next few days...)
ETA: 4 1422 April 2007, Wednesday
after several attempts, i've come to the conclusion that:
(A) there's no need for honey,
(B) Semillon Sauvignon Blanc (mine's always a Wolf Blass) is a good dry white,
(C) there needs to be enough wine to reasonably submerge the chicken--no worries, you won't inebriate, at least 3cups therefore.
(D) you should replace brown with red/ spanish onions,
(E) it's good to let your chicken marinate for 24 hours, and
(F) there's no need for soy sauce.
Sunday, October 22, 2006
Lemon Caper Pasta with Minced Beef
I woke up this morning, a little later than usual and so, I decided to make brunch.
And Pasta is a hungry student's best friend.
Now, this dish was put together on the fly, so I don't have pictures, but I'm posting it up because I think its cool what you can do with a little creativeness in the kitchen.
It tasted amazing.
You'll just have to try it to beieve it.
Especially if you like tangy flavors.
I just finished eating it.
So.
All I had in my fridge was:
Minced beef, a lemon, a bottle of capers, butter, some leftover sweet sauce (from the roast duck we had the other day), worechestier (sp?) sauce, sesame seed oil, some herbs, a small bit of butter, onions and garlic. oh and spaghetti.
Sounds like a recipie, but looks a mess in the fridge.
I'm having tropical fruit yoghurt for desert. That's in the fridge as well. :)
---------------------------------------------------------
Ingredients.
Minced beef (about a handful)
1/2 Lemon
Spaghetti (portion for 1)
1/2 medium sized Onion
3 cloves of Garlic
1 spoonful of Capers (or however much you fancy)
2 tbsp sweet sauce (i'm pretty sure you can substitute this with sugar or mango chutney)
4 tbsp water (to dilute the sweet sauce)
worechiester sauce
sesame seed oil
salt
pepper
butter
mixed dried herbs
Serves.
1
Step 1: Marinate the Beef
Take a bowl, put in the beef, a few dashes of worechestier sauce, a dash or seseme seed oil and a small sprinkle of salt and pepper. Mix it up and set aside.
Step 2: Boil your pasta
Boil a pot of hot water, throw your pasta in with some salt.
Step 3: Other ingredients
Dice your onion and garlic and set aside.
Take some hot water from your still boiling pasta to melt/dilute the sweet sauce.
Ready your lemon, capers and butter and herbs.
Step 4: Quick tossing in the pan
Your pasta should be cooked by now.
drain it and put it on a plate. right next to all your other ingredients.
Melt some butter in the pan.
throw in the onion and garlic and fry to bring out some fragrance.
throw in your beef and fry, making sure it seperates.
throw in your pasta.
throw in your capers.
squeeze in the lemon juice.
pour in the sweet sauce.
add a dash of pepper and salt to taste.
sprinkle with herbs.
Toss this in a medium heat in your pan and you'll start smelling the beautiful aroma of warm lemon.
Final Serve.
Plate your pasta and sprinkle with a bit more herbs if you like.
-----------------------------------------------------------------
the reason why this dish works is -
Sweet curbs sour.
so a balance between sweet and sour is the key.
cheers :)
...
..
.
ETA (24 0212 Oct 2006 Tuesday):
it's worecestershire sauce -- d
Thursday, October 19, 2006
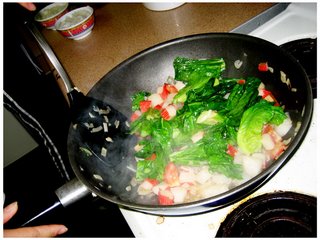
Vegetable Stir-Fry with Sweetsavoury Sauce
hoookay.
here's an uber simple, basic stir fry dish that you can make with almost any combination of vegetables.
-------------------------------------------------
Vegetable Stir-Fry with Sweetsavoury Sauce
This is kind of my own invention (the sauce).
I've had the older people (the parents) advise me in the past, to not put sugar with vegetables, but i plain disagreed and did it anyway.
They love the sauce.
And I've been making it this way ever since. :)
note: green leafy vegetables will shrink to half the portion after its been cooked. so keep that in mind when trying to figure out how much vege to cook.

Ingredients.
Any Vegetable for 4, cut up to bite size
(here I've used British spring green, tomatoes and radish)
3 cloves garlic, sliced
1/2 onion, medium sized, diced
1 tbsp cooking oil
Optional ingredient:
8 crab sticks, cut into bite size
For the sauce:
2 tbsp oyster sauce
1 tbsp white sugar
1 tbsp corn starch (for thickening)
1/2 rice bowl of hot water
salt & pepper to taste
Serves.
4-5
Step 1: Cut everything up
It should look somewhat like this.
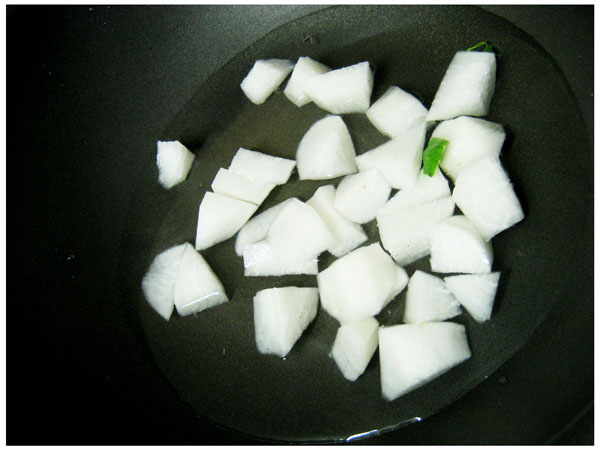
Step 2: Boil the radish
This is useful information.
Radish is generally hard and tasteless when its not very cooked.
When you boil it, it goes soft and juicy and sweet.
You'll know its done when it turns semi-transluscent.

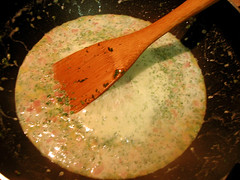
Step 3: Make the sauce
Get a bowl and put in all the ingredients for the sauce and mix it up.
The reason why we use hot water, is to dissolve everything.
It will look cloudy and brown now, but when you cook it, corn starch goes clear.
Leave this aside.

Step 3: Stir-Fry!
Heat up the oil in the Wok.
When the oil is hot, throw in the onion and garlic and fry till its fragrant.
(essential in most chinese cooking.)
Now, by order of cooking time (or vegetable hardness), throw the remaining into the wok.
Pour in the sauce all around the vege and continue frying till the vegetables cook.
Use the wok's cover to trap the steam to speed cooking up and to keep the juices in.
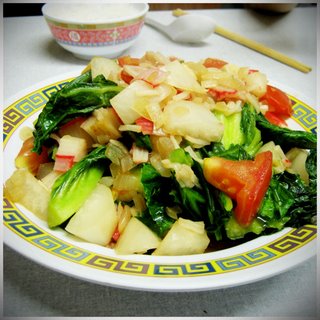
Final Serve.
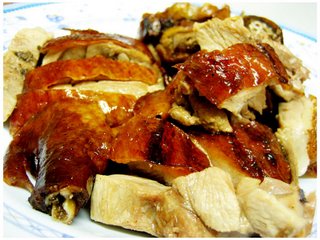
We were lucky. Someone bought us some duck to go with our vege!
It was sweet and savoury and oh so good.
Everything goes really well with steamed white rice.
I'm getting hungry just typing this.
Someone needs to teach me how to make roast duck.
:)
here's an uber simple, basic stir fry dish that you can make with almost any combination of vegetables.
-------------------------------------------------
Vegetable Stir-Fry with Sweetsavoury Sauce
This is kind of my own invention (the sauce).
I've had the older people (the parents) advise me in the past, to not put sugar with vegetables, but i plain disagreed and did it anyway.
They love the sauce.
And I've been making it this way ever since. :)
note: green leafy vegetables will shrink to half the portion after its been cooked. so keep that in mind when trying to figure out how much vege to cook.

Ingredients.
Any Vegetable for 4, cut up to bite size
(here I've used British spring green, tomatoes and radish)
3 cloves garlic, sliced
1/2 onion, medium sized, diced
1 tbsp cooking oil
Optional ingredient:
8 crab sticks, cut into bite size
For the sauce:
2 tbsp oyster sauce
1 tbsp white sugar
1 tbsp corn starch (for thickening)
1/2 rice bowl of hot water
salt & pepper to taste
Serves.
4-5
Step 1: Cut everything up
It should look somewhat like this.

Step 2: Boil the radish
This is useful information.
Radish is generally hard and tasteless when its not very cooked.
When you boil it, it goes soft and juicy and sweet.
You'll know its done when it turns semi-transluscent.
Step 3: Make the sauce
Get a bowl and put in all the ingredients for the sauce and mix it up.
The reason why we use hot water, is to dissolve everything.
It will look cloudy and brown now, but when you cook it, corn starch goes clear.
Leave this aside.
Step 3: Stir-Fry!
Heat up the oil in the Wok.
When the oil is hot, throw in the onion and garlic and fry till its fragrant.
(essential in most chinese cooking.)
Now, by order of cooking time (or vegetable hardness), throw the remaining into the wok.
Pour in the sauce all around the vege and continue frying till the vegetables cook.
Use the wok's cover to trap the steam to speed cooking up and to keep the juices in.

Final Serve.
We were lucky. Someone bought us some duck to go with our vege!
It was sweet and savoury and oh so good.
Everything goes really well with steamed white rice.


I'm getting hungry just typing this.
Someone needs to teach me how to make roast duck.
:)
Monday, October 16, 2006
Savoury Steamed Egg & Mince
Hello all.
I'm terribly sorry for the long absence ... but I haven't had the time nor the resources to whip up anything remotely exciting in the last couple of weeks and here's the reason why:
The people in my flat are adverse to trying new things AND they also have meat preferences, which means i'm generally stuck cooking everyday, homecooked chinese meals.
1 meat dish (pork or chicken only) and 1 vegetable dish.
I'll endeavour to create some exciting weekend lunches tho'.
Just for me and you. :)
With that said, here's a simple homecooked cantonese dish that everyone can make and is very traditional and delicious!
-----------------------------------------------------
Savoury Steamed Egg & Mince
My grandmother used to make this for lunch. It brings back loads of memories. You can generally find this in authentic cantonese homestyle cooked restaurants!
There are several versions of this dish, one with salted fish, one with tofu and one with just egg.
I generally prefer just egg or with tofu, because it's more soothing and smooth to eat.
note: you will need some sort of steaming rack and plate.
Ingredients.
300g minced pork
2 eggs
1 tbsp, sesame seed oil
3 tbsp, light soy sauce
1 tsp, white sugar
3 tbsp, garlic granula
2 dashes of black/white pepper
(*optional: 1/2 block of silken tofu)
Serves.
4-5

Step 1: Marinate the Minced Meat
Wash your hands and use them.
Put the minced meat in a bowl and add the pepper, salt, sugar, sesame seed oil and light soy sauce, and mix it all up evenly with your fingers.
Leave aside for at least 10 mins. (longer if you're not pressed for time.)
Step 2: More mixing
Crack your 2 eegs into the bowl and mix evenly (break the yolk)
*as an option, you can also mix in the tofu. just be careful not to mash it up too much. you still want a bit of texture.
Step 3: Steam away!
Place your egg'n'mince into a dish suitable for steaming.
(I used a metal plate. good heat distribution)
And just Steam for about 20mins :) easy.
Final Serve.
You can opt to keep it in the same dish (for a home feel) or dress it up by plating it. just tip it out of the cooking dish along with the savory juices into a clean dish and serve steaming :)
[sorry i don't have a picture of the final product ... it smelt so good that day we slurped everything up!]
try it!
Saturday, October 14, 2006
oopsie daisies: cup measurements.
you know, i always knew there was something wrong with the measurements of ingredients i publish. the truth is, i don't use them chef tools, so when i say "cup", i mean something like 150ml instead of 273ml simply because i use my drinking cup....
oopsie daisies!
so please take note of cup measurements in past entries. i have approximated the tablespoons and teaspoons according to conventional cooking measurements, so you needn't worry too much about that. will endeavour to be more precise with my cup measurements.
:x
oopsie daisies!
so please take note of cup measurements in past entries. i have approximated the tablespoons and teaspoons according to conventional cooking measurements, so you needn't worry too much about that. will endeavour to be more precise with my cup measurements.
:x
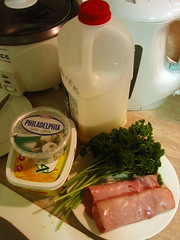
Thursday, October 12, 2006
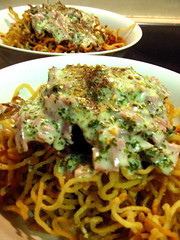
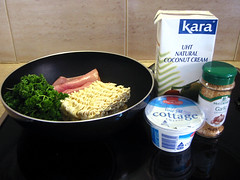
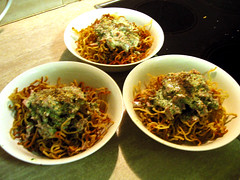
Crispy Noodle Salad.
sometime ago, i attempted this dish at ryce's place to no avail. since getting flour for the crepes, however, i finally have the necessary ingredient to ensure that the noodles turn out the way they should when fried.
Ingredients.
2 slab, instant noodle
3 slice, smoke ham
3-4 bunch, parsley or coriander/ cilantro
3 tbsp, cream cheese
1 cup, coconut cream
1-2 cup, flour
3 tbsp, garlic granula
some cooking oil (for deep-frying)
*black pepper to taste
Serves.
2-3.
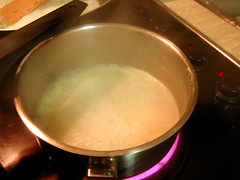
Step 1: Cook your noodles.
simple: boil the noodle in a pot of water until it's cooked. as i seldom attempt instant noodles in its simplest fashion, i only learnt from ryce that instant noodle's really only cooked when the strands have separated themselves and are soft to a bite.
when cooked, drain the water away.
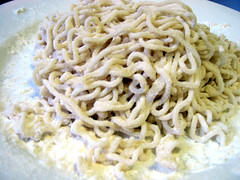
Step 2: Coat noodles with flour.
coat the noodle with flour, ensuring that the noodle's sufficiently floured up. the flour helps to absorb excess water and allows the noodle to stay separate in the frying process.
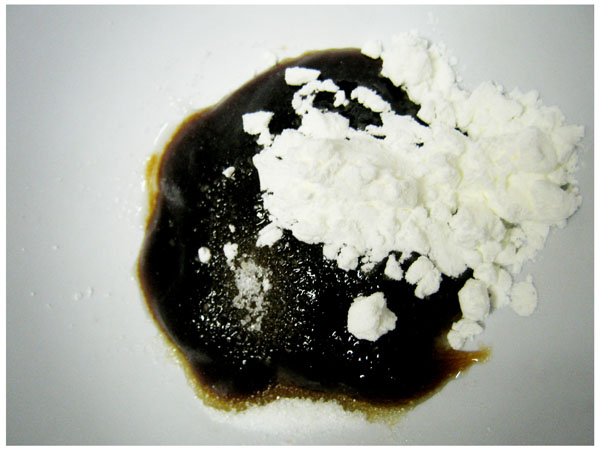
Step 3: Prepare your sauce.
Mince the parsley and ham up. Over a medium flame, pour the coconut cream into the pot . add the cheese, parsley and ham into the solution. allow it to come to a boil and simmer for about 5 minutes.
Step 4: Fry the noodle.
while you're awaiting the sauce to boil, pour about half a cup full of cooking oil into a wok/ pan over a high flame. when the oil is hot, throw a handful of the floured noodle into the pan and let it fry. it should take 5-7 minutes for the noodle to fry. if you do not have enough oil for actual deep-frying, ensure that you stir the noodle constantly.
fry until golden brown.
repeat the process until you've fried all the noodle. you might have to change the oil and clean the wok/ pan at some point if it gets too dirty.
Final Serve.
in each bowl of crispy noodle, pour the sauce on top before sprinkling the garlic granula and pepper.
while this attempt was far better than the last, the sauce ended up a bit too thick. i would suggest adding 1 cup of fresh milk or just some water into the sauce-cooking process at Step 3 to thin the solution. not too much of that, otherwise you might lose the coconut flavour of the sauce :)
Wednesday, October 11, 2006
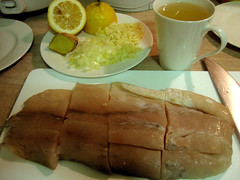
One-Step Whitebread Pizza.
remember the loaf of bread that was lying in ryce's fridge? well, other than toasting your bread, or making french toast out of it, we can use it as base for your favourite pizza toppings!
Ingredients.
6 slice, whitebread
3 roma tomatoes
4, cup mushroom
3 piece, smoked ham (or your favourite meat, e.g. smoke salmon, left over chicken)
3 tbsp, sour cream (you can use other sauce base like bolognese)
some cheese (the usual suspects like mozzarella, parmesan, etc)
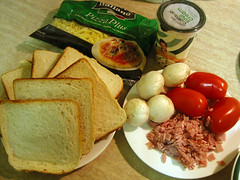
*missing: 1 capsicum (ryce doesn't do capsicums -sigh-)
Serves.
3
Step 1: All at Once!
dice the tomatoes, mushrooms and ham into fine pieces. coat the bread with a generous layer of sour cream, then apply the tomato, ham and mushroom on it. top that with a good cover of cheese.
preheat your oven to about 150 degrees, and pop your pizza in for 5-10 minutes. basically until your cheese melts and browns a little at the edges.
Viola!
Final Serve.
easy to prepare, tastes good, and helps rid of surplus without having to either dump them away or promote fungus growth!

Ingredients.
6 slice, whitebread
3 roma tomatoes
4, cup mushroom
3 piece, smoked ham (or your favourite meat, e.g. smoke salmon, left over chicken)
3 tbsp, sour cream (you can use other sauce base like bolognese)
some cheese (the usual suspects like mozzarella, parmesan, etc)
*missing: 1 capsicum (ryce doesn't do capsicums -sigh-)
Serves.
3
Step 1: All at Once!
dice the tomatoes, mushrooms and ham into fine pieces. coat the bread with a generous layer of sour cream, then apply the tomato, ham and mushroom on it. top that with a good cover of cheese.
preheat your oven to about 150 degrees, and pop your pizza in for 5-10 minutes. basically until your cheese melts and browns a little at the edges.
Viola!
Final Serve.
easy to prepare, tastes good, and helps rid of surplus without having to either dump them away or promote fungus growth!
Tuesday, October 10, 2006
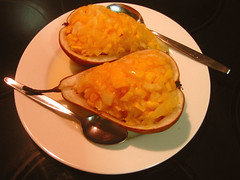
Grilled Stuffed Pear with Pawpaw.
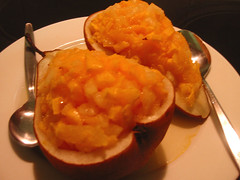
following our dinner, i decided to try to brush up on my dessert-making skills. admittedly, i'm terribly bad at getting my desserts done right.
there's quite a bit of pawpaw left over from our last dessert exercise, and we got these brown pears from the supermarket. this dessert's a simple one that i actually like to serve with ice-cream.
Ingredients.
1 pear
1 slice, pawpaw
1 lemon
Serve.
2
Step 1: Digging your pear!
slice your pear in two (length-wise), and start digging the flesh out without breaking the skin. we're using the pear skin as a recepticle for our stuffing.
Step 2: Preparing the stuffing.
dice the pear flesh dug out earlier with the pawpaw and toss them together nicely. add lemon juice to the mixture.
when done, stuff the pear skins with the mixture.
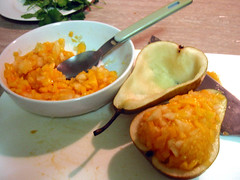
Step 3: Grilling the pear.
preheat your oven to about 100 degrees, set the pears to grill for at least 10 minutes (i stopped at about 15 minutes). this would allow the pear to grill nicely without actually drying up.
Final Serve.
this dish is normally prepared by mixing some melted chocolate into the fruit salad, and (at serving time) a scoop of vanilla icecream. without the chocolate and icecream, the only redeeming quality was the lemon juice that gave it that required balance.
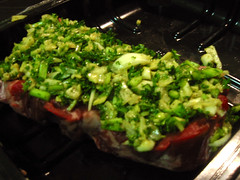
Grilled Fish with Parsley Ham Sauce, Steamed Vegetables & Steak Strips.
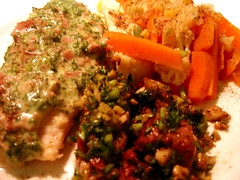
ryce and i did a bit of grocery shopping last saturday for this week's meals. during our headless-chicken scouring of the aisles, ryce insisted that we grab some fish because she's not had those in a while, so we did. Barramundis were the specials on sale at the deli, so we got a good big slab of that.
today, ryce decided to ask her best friend, Jac, and the latter's boyfriend over for some "gourmet food" (my claim). i figured i'd cook the slab of fish before it rots, and do it in a fashion similar to what i did a couple of months ago. the idea here is to keep the fish as simple as possible, but topped with a sauce that contains some other kind of meat. in my earlier attempt, it was a parsley crab sauce.
Ingredients.
(the fish and its marinade)
Fish, enough for 4 people
2 inch, ginger
4-5 clove, garlic
.5, onion (brown in this case)
1, lemon
1 cup, white wine (dry)
(for accompanying sauce)
1 cup, milk
2 tbsp, cream cheese
2 tbsp, butter
3-4 stalk, parsley
2-3 slice, smoked ham (i normally use other seafood)
(for vegetable side)
.5 whole, cauliflower
4 baby carrots
NOTE:
1) we'd be using the fish marinade as dressing for the vegetables.
2) i'm not explaining the process for the beef strips. basically, i'm using one piece of scotch fillet which will be sealed in a pan, then left in the oven at abt 150 degrees for another 10 minutes. it'd be coated with a pesto quite alike what i did for the coriander pan-fried lambchop, only this time i'm using parsley instead of coriander/ cilantro.
Serves.
4
Step 1: Marinating & cooking the fish.
Mince the garlic, ginger and onion up before tossing them together in a big bowl. Squeeze the juice out of your lemons into the bowl, then grate the skin for some zest. Pour the wine in, then place your fish steaks into the mixture. leave it to marinate for at least half an hour.
just before you cook the fish, preheat your oven at 175 degrees. then place your fish steaks (skin at the bottom first) into the oven to grill for about 15 minutes. mid-way, flip it over to cook on the side of the skin.
(this would be a good time to place your beef steak into the oven for about 5 minutes after you've sealed it in the pan.)
Step 2: Preparing the vegetables.
while waiting for your fish to marinate/ cook, dice your cauliflower and carrots up. Toss them together and prepare to steam them for a good 10-15 minutes. remove from heat when done.
Step 3: Preparing the sauce & marinade sauce.
while the fish is cooking, mince the parsley and dice the ham up into finer pieces. over a medium-small flame, pour the milk into a small pot. add the cheese, butter and ham into the milk. when it simmers to a slow boil, add the parsley in and let it simmer for another 5-6 minutes. keep stirring to prevent any overburn.
concurrently, over a medium flame, pour the remaining fish marinade into a pot. let the mixture reduce by about half.
remember to take your beef steak out from the oven when it's ready. slice it into thin slices as a side.
Final Serve.
it was only after i had finished cooking everything that i remembered that my earlier attempt at this was done with nothing but wine and rosemary for the fish's marinade. the garlic and ginger turned out to be slightly over-powering this time round, and i'd gladly reduce the ginger to about an inch, and garlic to 1 or 2 cloves.
i did however really enjoy the reduced marinade as a dressing for the steamed vegetables. likewise, the parsley ham sauce tasted well, only i still think fish should be matched only with another seafood-based sauce. i would have gone with either crab or prawn.
Subscribe to:
Posts (Atom)
